
In the input_options we define the settings used for reading the input files for both polygons and point clouds.
If a class is not defined in the YAML the default values will be used. Default values can be found in resources/config_files/myconfig_DEFAULTS.yml.
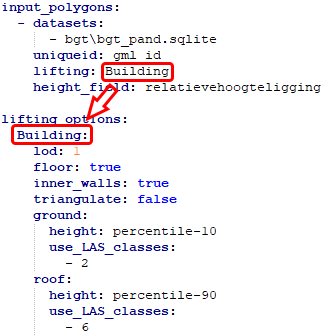
input_polygons
One of the most important parts of the configuration is setting what vector data to read and to map it to the correct class for lifting. The files, or layers, are all mapped to a single lifting class. With this mapping it defines what rules to use for lifting and stitching each polygon.
datasets
There are two ways to map datasets to the lifting class depending on the input files. For file formats that have a flat structure and only contain a single layer per file we have the flat configuration. File formats like GML supporting multiple layers can be configured using a nested configuration.
- Flat config
- datasets:
  - D:\data\campus\partof.shp
  - D:\data\campus\otherpart.shp
  uniqueid: FACE_ID
  lifting: Building
- datasets:
  - D:\data\campus\terrain.shp
  uniqueid: TERRAIN_ID
  lifting: Terrain
The simplest configuration that is mainly used it a flat configuration. It describes a dataset configuration for a single class. First create a new level with a leading dash per datasets and add a new level with a leading dash per filename. Make sure the spacing is correct; the filename needs to be at the same level as uniqueid and lifting and a spacing deeper then datasets. There can be multiple files configured for this class in a single dataset configuration. In this case both files must contain the same attribute configured at uniqueid.
- Nested config
- datasets:
  - D:\data\campus\polygons.gml
 uniqueid: fid
 lifting_per_layer:
     Buildingfootprint: Building
     Terrainobjects: Terrain
     Waterways: Water
As an alternative a file with multiple layers can be used for input polygons. In this example the polygons.gml file consists of three layers: Buildingfootprint, Terrainobjects and Waterways. These layers are mapped using the
lifting_per_layeroption by defining the class per layer name.
uniqueid
This is the name of the attribute in the input file that contains a unique value per feature. In case nothing is put here it uses fid by default. CHECK THIS When identifiers from different datasets conflict with each other, many of the output formats will be invalid according to their standard. This is because each object in the final model has to have a unique id, even when originating from different sources. Note: Multipolygons are split so the identifier is changed by adding a trailing counter.
lifting
This is a class name corresponding to the list of the lifting options defined in Lifting options. In total there are 7 different possibilities to choose from;
- Building
- Terrain
- Forest
- Water
- Road
- Separation
- Bridge/Overpass
height_field
This is the attribute name of an integer attribute. This integer attribute describes the different relative height levels of polygons overlapping in 3D. This describes the vertical relationship between the objects. In Dutch BGT all objects with height_field = 0 describe the ground level. All objects above are counted in positive direction (a bridge would have level 1) and objects below ground level are counted in negative direction (a tunnel would have level -1). More information on how this is applied in BGT
handle_multiple_heights
When the input polygons use the height_field this boolean setting describes if these multiple vertical overlapping objects need to be used (height_field attribute with any value) or to just use the ground level polygons (height_field attribute with value of 0).
input_elevation
Without point clouds the algorithm cannot perform ‘3dfying’ of the polygons. Therefore we need to configure the point cloud files and what to read.
datasets
- Single file
- datasets:                         # List of data set with specific settings
  - D:\data\top10nl\schie\ahn3.laz  # Definition for one or multiple LAS/LAZ files using the same parameters
To read a LAS or LAZ file with points the filenames have to be defined in datasets section of the input_elevation section. First create a new level with a leading dash per datasets and add a new level with a leading dash per filename. Make sure the spacing is correct; the filename needs to be a spacing deeper then datasets.
- Directory
- datasets:                         # List of data set with specific settings
  - D:\data\top10nl\schie\*         # Definition for reading a full directory with LAS/LAZ files using the same parameters
Alternatively all files in a directory can be read at once. Instead of writing a filename an * is used to define to use all files in that directory. There is no check for file extension so do this for a directory with LAS/LAZ files only.
omit_LAS_classes
omit_LAS_classes:      # Option to omit classes defined in the LAS/LAZ files
  - 1 # unclassified   # ASPRS Standard LiDAR Point Classes classification value
  - 3 # vegetation
  - 4 # vegetation
  - 5 # vegetation
Many point clouds contain classes that are not used for the creation of the 3D models. Classes like unclassified or vegetation points. These classes can be completely omitted during the reading process. When defined in this section all points with these classifications are ignored.
thinning
thinning: 10 # Thinning factor for points, this is the amount of points skipped during read, a value of 10 would result in points number 10, 20, 30, 40 being used
Thinning is used to skip a certain amount of points while reading. When using point clouds with a large amount of points one can use this for getting results quicker. When testing a configuration or area one can set this value to skip points and make the process faster. There is nothing smart done here, the reader simply skips the set amount of points during reading. The equation used here is point number % thinning value == 0 so only points that have value modulo equal to zero are used. When setting this value to 5 points the reader will use point 5, 10, 15, 20 and so on.