Windows: vcpkg with Visual Studio & CLion
Warning
We recommend you use Chocolatey to install packages, or WSL.
vcpkg is an alternative, but it is more complex and difficult to setup.
Why an alternative solution?
Using thrid-party libraries can sometimes not be very straightforward on Windows, actually using WSL on Windows is indeed a convenient way. However, there are some disadvantages:
-
WSL will incrementally occupy system disk space.
WSL is installed on C drive by default, there are quite a lot blogs on the internet to show how to move your WSL to another drive, but usually it is not recommended to avoid possible issues.
-
running project in WSL can be slow
It depends on the situation, but practically speaking, the more you use WSL, the slower the compilation speed and the running speed may be as the size of the occupied space increases.
Another concern is about gcc/g++ compiler, in some situations, it compiles slower than MSVC(cl.exe) on windows(for example in our practice MSVC compiles CGAL faster)
-
separately isolated file system
The file system of WSL is separated from windows, which means only if you have opened WSL from windows, the files in it can be accessed. This is sometimes not convenient.
Using vcpkg and visual studio on windows
What is vcpkg? To be in short, vcpkg is a free C/C++ package manager for acquiring and managing libraries. Maintained by the Microsoft C++ team and open source contributors.
install vcpkg
Step 1: Clone the vcpkg repo
Make sure you are in the directory you want the tool installed to before doing this.Step 2: Run the bootstrap script to build vcpkg
Step 3: Install libraries for your project
While in the directory of vcpkg:
Step 4: Using vcpkg with MSBuild / Visual Studio (may require elevation)
Note: Step 4 is not necessary if you are using CLion.After this, you can create a new project or open an existing one in the IDE. All installed libraries should already be discoverable by IntelliSense and usable in code without additional configuration.
For more detailed info, you can refer to vcpkg - get started
install CGAL
if you want to specify 64bit version:
install GDAL
Notes:
It would be more convenient if you use Windows Powershell. In Powershell, you can install libraries via:
All in all, using WSL can make you familiar with the linux environment in advance - if you will use linux for development in the future. While if you are using windows platform (as far as I know most of first year students are using it since the Geomatics suggests so), it might be a good idea to use vcpkg and MSVC.
And with regard to vcpkg, there is one very comprehensive video:
It explains how you download and build vcpkg and use it step by step.
Using vcpkg with Visual Studio
Since we've integrated vcpkg with MSBuild / Visual Studio, you need to do nothing if you are using Visual Studio C++ project. In your header / source files, you can for example just type:
and the header file should be automatically detected and included.if you are using CMake project, you need to add corresponding scripts in your CMakeLists.txt file, for example, if you want to include CGAL:
find_package(CGAL)
if (CGAL_FOUND)
    include(${CGAL_USE_FILE})
    message(STATUS "CGAL found")
    message(STATUS "CGAL VERSION" " " ${CGAL_VERSION})
else()
    message(SEND_ERROR "this code requires the CGAL library")
    return()
endif()
Using vcpkg with CLion
(1) configure C++ tool chain: File -> Settings -> Build, Execution, Deployment -> Toolchains

see here for more details.
Note: About selecting architecture:
-
x86: The compiler is the x86 version and the output target is x86.
-
amd64_x86: The compiler is the amd64 version and the output target is x86.
-
amd64: The compiler is the amd64 version and the output target is amd64.
-
x86_amd64: The compiler is the x86 version and the output file is amd64.
(2) configure CMake option: File -> Settings -> Build, Execution, Deployment -> CMake
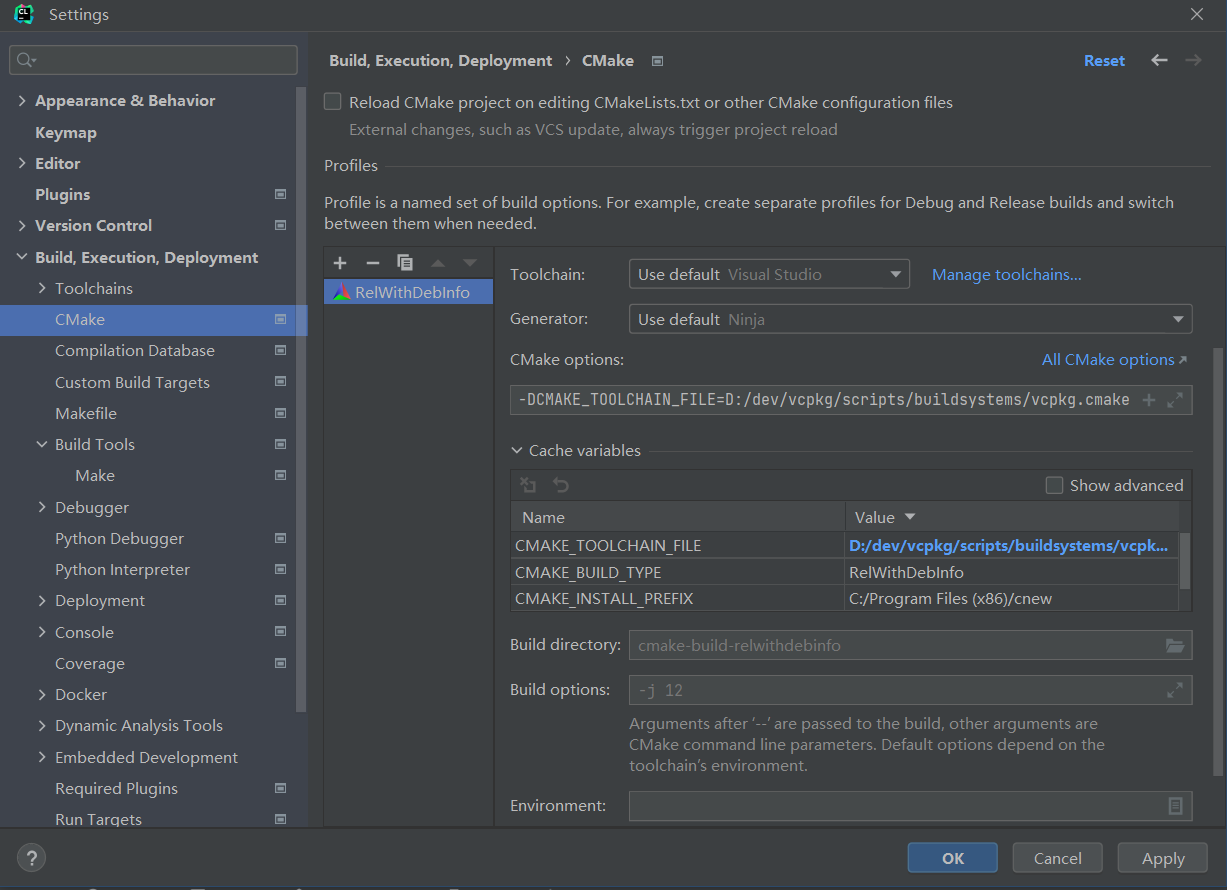
Now you are all set to include your desired library in CMakeLists.txt, for example include CGAL:
