How to connect to a TU Delft Linux server with ssh
The connection to a TU Delft Linux server is done with SSH through your terminal on Unix-based systems or PowerShell on Windows. On Windows you can also use PuTTY, but the recommended option is WSL, which lets you follow the macOS/Linux instructions below.
When working remotely, make sure eduVPN is installed and active wherever eduroam is unavailable.
Step 1: Connect to the jump server
Direct SSH access to TU Delft servers is not allowed, so you must first connect to a jump server.
Warning
For TU Delft employees the jump server is linux-bastion-ex.tudelft.nl; for students it is student-linux.tudelft.nl. This guide uses student-bastion-ex.tudelft.nl as an example.
Run the following in your terminal or PowerShell, substituting <netid> with your NetID and the correct jump server name:
Enter your NetID password when prompted. If your connection is successful, you will be connected to the jump server.
Step 2: Connect from the jump server to the TU Delft server
Once connected to the jump server, ssh directly to your server. Its hostname should be in the email you received (here we use gilfoyle.bk.tudelft.nl as an example).
Depending on the username you received in the email there are 2 options:
A) If the username is the same as your NetID, run:
B) If it differs from your NetID, run:
When you are prompted for a password, give the temporary password from the email. Then set up your new password.
Congrats! You have connected to the server!
Step 3: Make the connection easier with SSH keys (optional)
3.1 Create an ssh key
To connect to the server faster and without the need for a password, you need to generate an SSH key pair. In your terminal/PowerShell, type:
and follow the instructions. The flag–t rsa is used to set the algorithm to be used for the key generation and can be substituted with -t ed25519, if preferred. It is recommended to use a password to protect your keys. You'll have to use this password every time you login, or you can use ssh-add to store it (once after you restart your computer). This command will create an SSH key pair in your ~/.ssh directory (on Windows this is C:\Users\<username>\.ssh). There will be 2 files, id_rsa for the private key and id_rsa.pub for the public one. If you choose to name your file differently (to avoid overwriting other ssh keys you might have) please make sure to use the correct file name in the following commands.
3.2 Create a config file
Create a file named config in your ~/.ssh folder (C:\Users\<username>\.ssh on Windows):
Then add the following content:
Host bastionex
Hostname student-bastion-ex.tudelft.nl
User <netid>

Host <server_name>
Hostname <server_hostname>
ProxyJump bastionex
User <username>
<netid> with your netid. Substitute <server_hostname> and <username> with your server credentials. Substitute <server_name> with a name you choose for the server. Example for gilfoyle:
For each server that you would like to connect to you can add the same snippet to your config file.
If you changed the key filename from id_rsa, add this line to each host:
3.3 Copy your public key to the jump server and each server
3.4 Usage
Once your ~/.ssh/config is set and your key is copied, log in with:
ssh <server_name>
Step 4: Transfer files to and from the server
You can transfer files over the same SSH connection. With the setup from Step 3 you can use the <server_name> alias, which tunnels through the jump server automatically.
Copy a local file to the server with rsync:
Reverse the paths to download:
Copy a local file to the server:
Copy a file from the server to your computer:
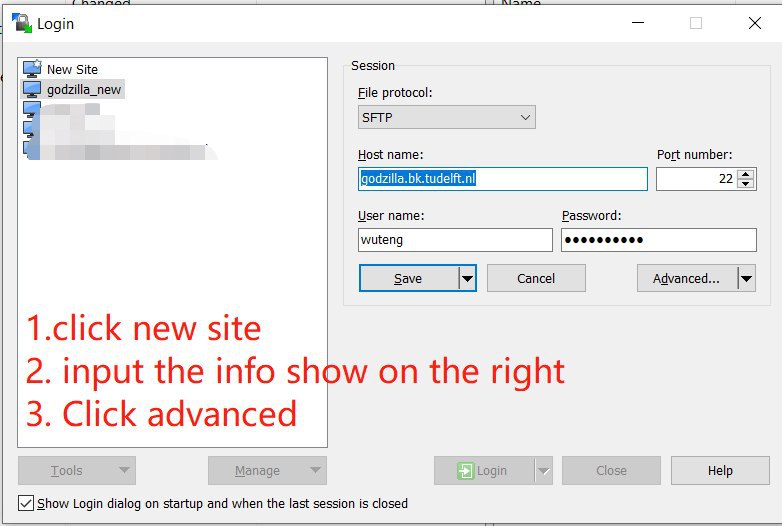
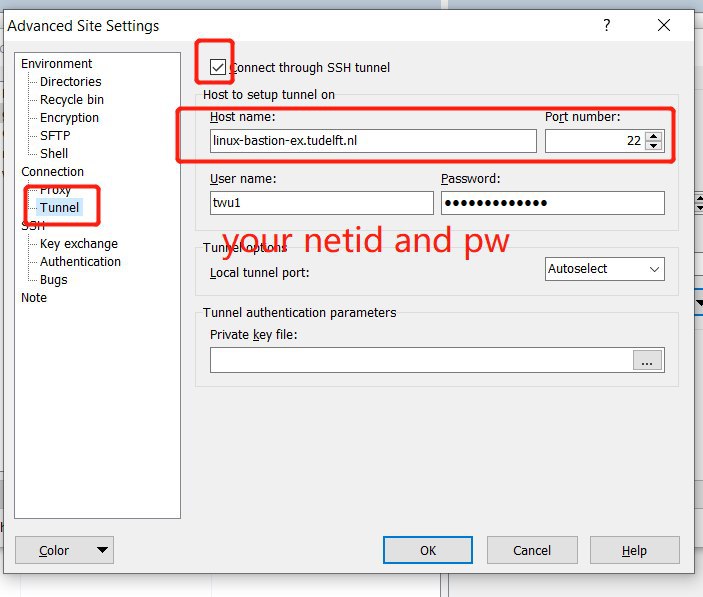
If you prefer using a graphical interface, you can use WinSCP and configure a session as shown below.